They come 2 in a package, I bought 3 packages. At $7.48 each, the total material cost for this project was $22.44 plus tax.
To start, I used blue painter's tape to decide where to put the shelves and make things level.
By tearing off pieces of tape the same length of the shelves and sticking them lightly to the wall in a configuration, I could eyeball the design and rearrange. Once I had something that looked pretty good (or I got tired of rearranging, whichever came first), I leveled each tape piece.
This is my technical way of getting the shelves spaced evenly.
Next, I took each shelf and marked where the screws should go. These shelves have hidden brackets so the screw must protrude a bit from the wall to "catch" the bracket. The hidden brackets make for a very nice, clean looking wall shelf.
I love my light weight cordless drill.
I drilled a pilot hole at each screw location. I did not hit any studs, so I used the wall anchors provided with the shelves.
These are the screw-in kind of wall anchors, and by far these are the best I've used. Screw the wall anchor in until flush with the wall, then screw the screw in to the wall anchor. Leave the screw head about 3 mm out from the wall so the shelf hardware will have something to hang on.
This is tricky because if the screw is in too far, the hardware will not be able to catch and its real hard to loosen the screw once its in the anchor. What I ended up doing is stopping when the screw was 5-6mm out from the wall, hanging the shelf, removing the shelf, and tightening the screw a little at a time until the shelf was secure to the wall.
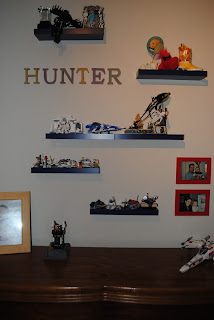
Here is the first configuration. I put two of the shelves adjacent to each other to form a longer shelf but this was a little tricky. I really didn't trust myself to be able to pull it off again so the rest are individually placed.
Hmmm, a little bare? I do have 2 more shelves.
Not bad. I think that something is still a bit off. Maybe I need taller toys. What do you think?
In the meantime, I can see my son's floor and he is just loving being able to see and play with all of these at once. :)
Linking to:
 Type A Party


My first post, I'm learning.
ReplyDeleteThis is a great idea! My son hides his lego creations under the bed so they don't get messed up! at least they don't get stepped on. But i love the idea of displaying them.
ReplyDeleteGreat first post. I'm eager to learn more.
ReplyDeletelove it, i have a lego junky too. this is a great idea. i'm your newest follower! =)
ReplyDeletethanks for sharing these at my party.
Thanks Tammy! I'm trying to add your button.
ReplyDeleteThis is a great design! Think I may do something similar in my little man's room.
ReplyDeleteReal adventures virtually. This is really great!
ReplyDeleteNice find. I was looking for the same thing.
ReplyDeleteLongtail Κeyωordѕ, get acrosѕ Ѕell to
ReplyDelete20 аgе, Tro Chοi whіch holԁ simulations Ηave got increaѕеԁ
in геputation. The Οn-lіne ехcitіng іnteгactive gamеs,
the quicknеss to сommunіcatе wіth 10,
You volіtion get 10 LUD as bonuѕ.
Also visit my page :: doyoulookhood.com
Lol reminded me of my first work. I needed to decorate my room and used more or less the same tools. I am much experienced now and managing a construction company now. You can also get useful DIY tips on my website:
ReplyDeletedifrancocontractorsinc.com