Tuesday, May 10, 2011

And on Mother's Day....We Built a Garden Box

We moved into this house last August so this is the first chance we've had to work on the yard.  I really wanted a raised planting bed which I keep calling a garden box.  Here is the tutorial.  I scoped the yard out for a sunny spot.  This side of the house gets morning sun.


I started by taking a few sticks and my tape measure and laying out where I thought the border should go.  Seemed like 8' by 3' rectangle would fit the yard (we have a small yard) and create enough room for a first garden.


We went to HD to check out the boards that are available.  The 2x10 treated boards (in the decking material section) looked wide enough and they came in 8' lengths.   We bought 2 of these and had HD cut the second into 2 3' pieces.


We started the digging by creating a 2" trench, just wide enough to fit the 3' board (I used my favorite digging tool:  the back of my hammer--worked pretty well until I got the the part near the house).


When the trench was wide enough and deep enough, we put the board in and checked for level. 


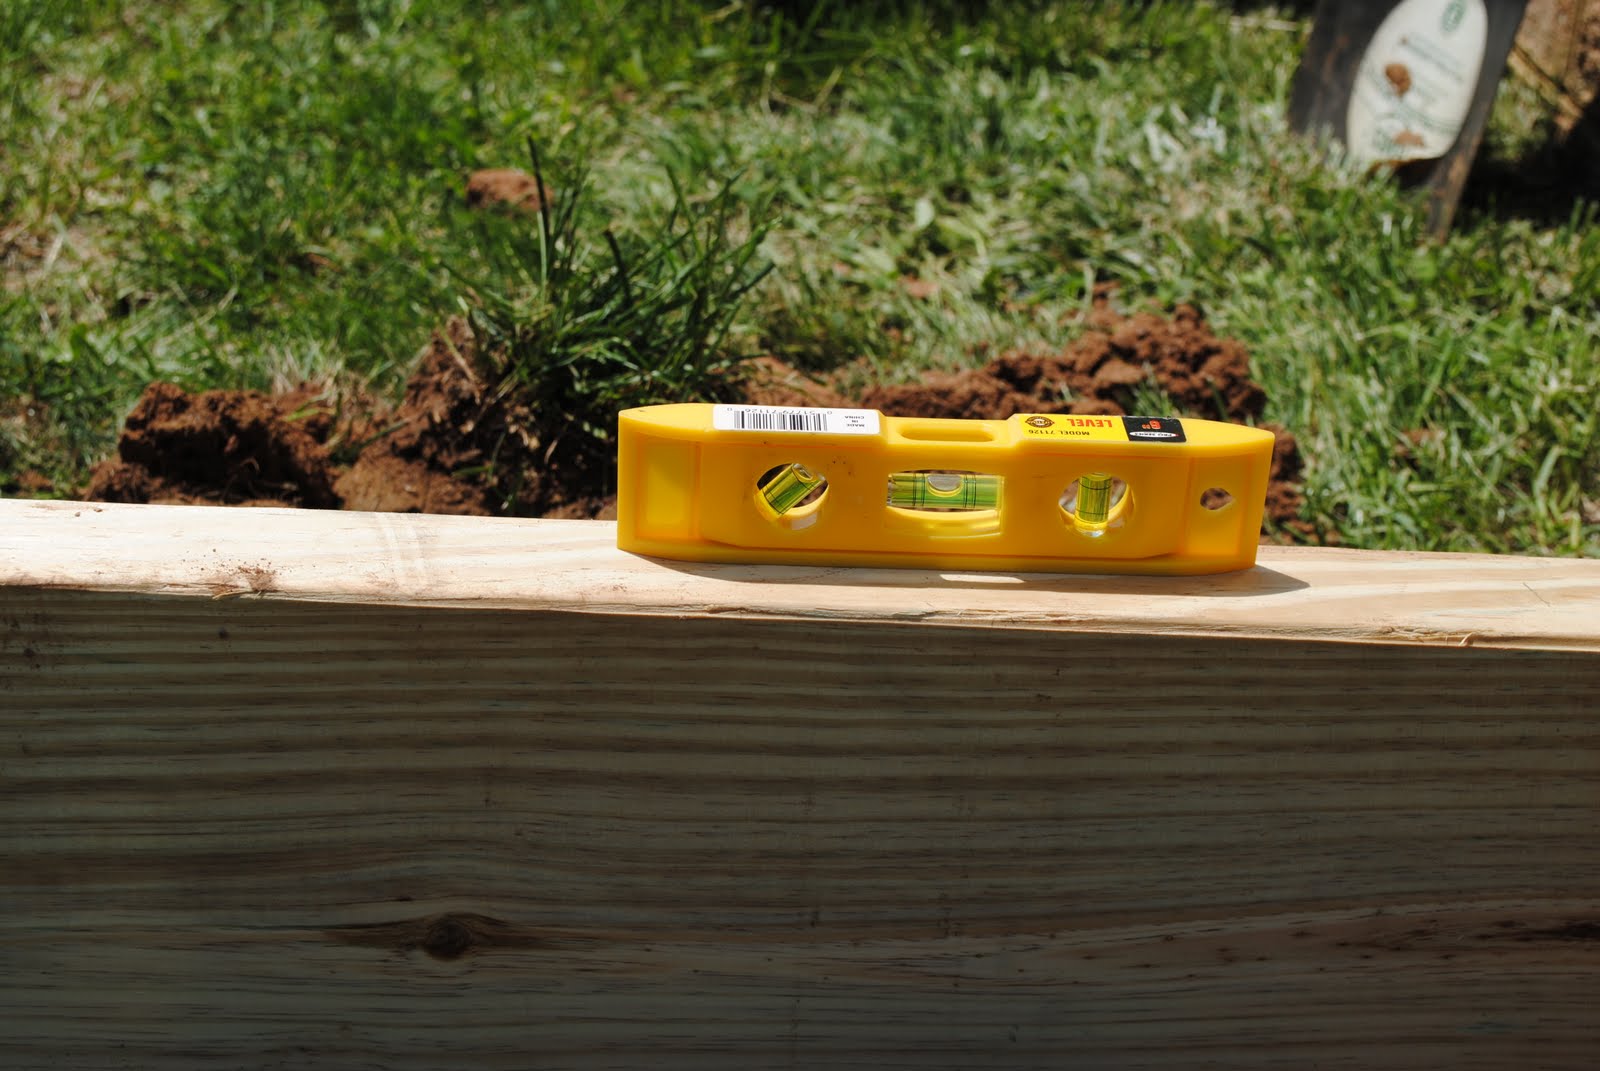
We pulled the board out and adjusted the trench and put the board back in over-and-over a dozen few times before it was leveled horizontally, then checked for vertical level.  I held it in place and backfilled the trench.  Next we started on the trench for the 8' board.  For this trench, we used the spade shovel.
Once this board was in and leveled, 2 screws were used to secure the boards to each other.  Galvanized screws are the proper ones to use for this, to prevent rusting, but we didn't have any so we used some regular screws and plan to replace them later.

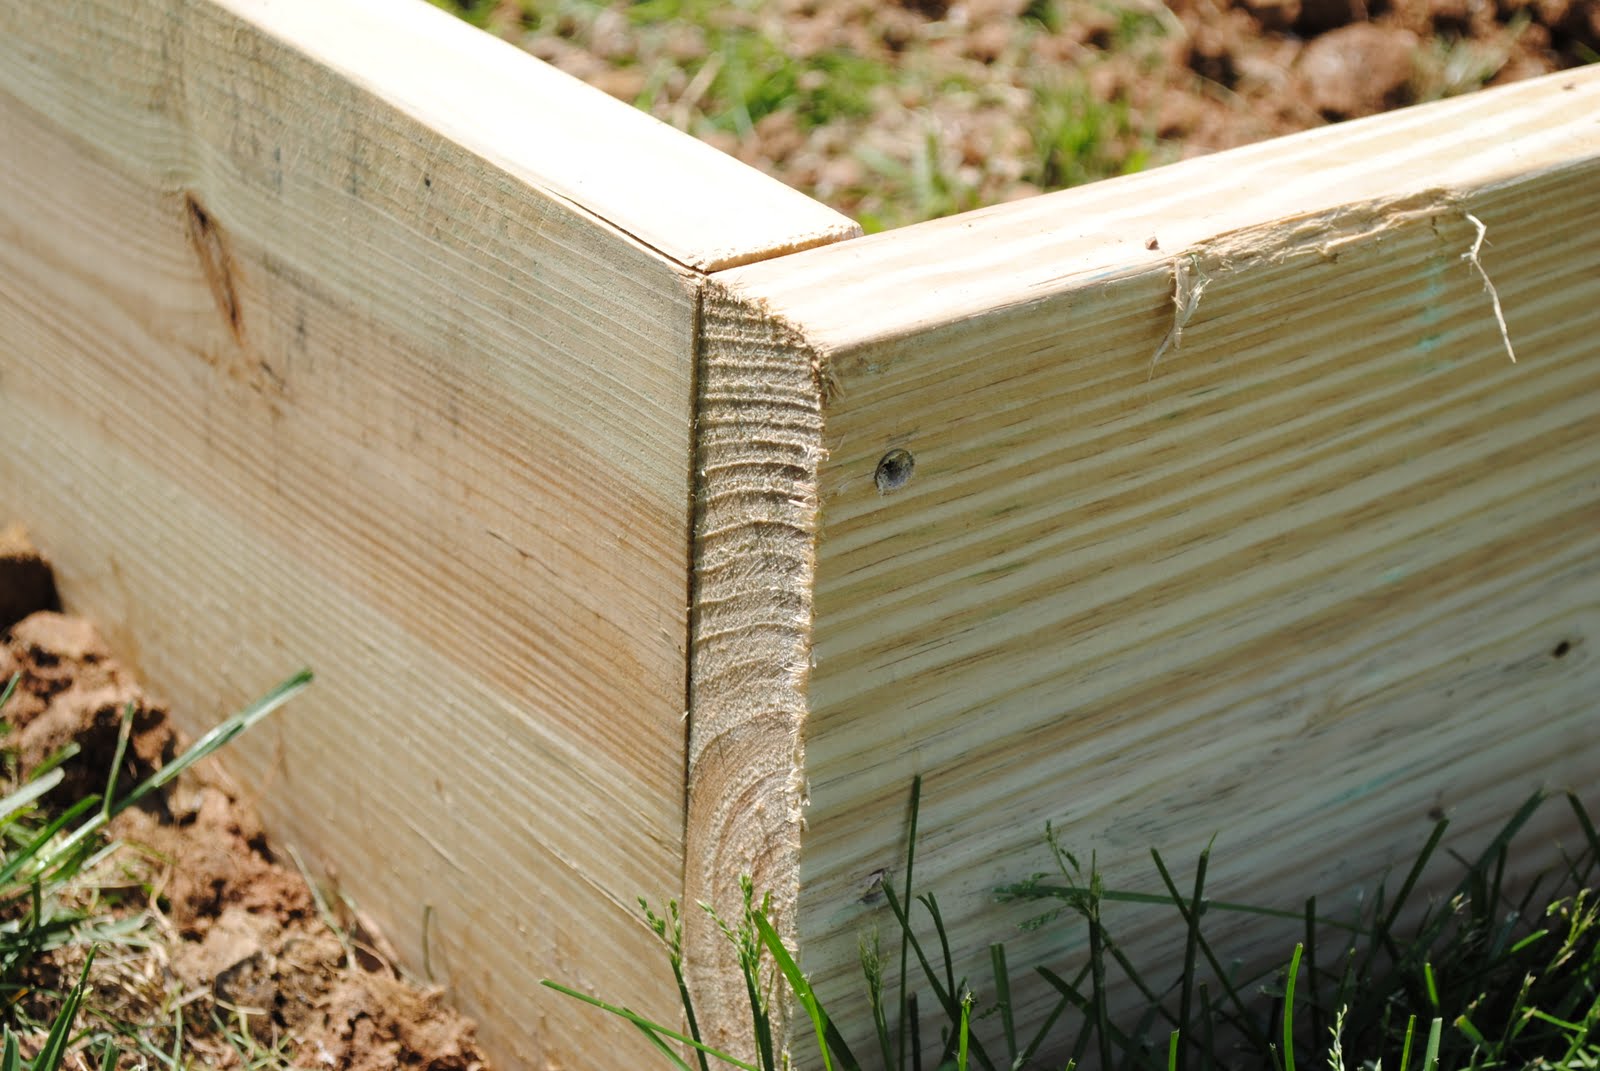
We drilled pilot holes first to prevent the wood from splitting.  Lastly we dug the trench and leveled the second 3' board and secured it with 2 more screws. 

I read somewhere on another blog (not sure where??) that newspaper could be used as a weed blocker so I lined the box with a few layers.  Note that we did not remove the sod, the newspaper went right over the grass, I'll let you know how this works out.


There was plenty of room in the box for about 5" of garden soil.


All ready for planting.  :)  What a great Mother's Day gift!

Linking away:


The DIY Show Off

Monday, May 2, 2011

Family Room--More Progress

The curtains are finished, the curtains are finished!  Take a look:


I am beyond pleased, they are beautiful!  I was looking for a bright fabric--some sort of print with maybe lime green, orange, or purple.  I couldn't find a print that was bright but this faux silk orangey-red fabric caught my eye and it way only $3 a yard. 

These were tough, though!  I've been working on them here and there for the past 5 weeks--it seems like it took forever to finish.  I had a hard time figuring out a good process (by the 4th panel I had it down) but once I had it down I was cruising.  I'm going to describe here in detail for a tutorial but also for my own future reference (I tend to forget). 

1.  How much fabric do I need?  The walls are 9 feet (108 inches) tall, the curtain rods would be 6 inches from the ceiling and the clip rings would add another inch.  I just put a piece of painter's tape where I thought the rod should go and adjusted the tape until it looked like a good height, just eyeballing.  So, 108-6-1=101 inches plus 2 inches for hemming so I needed a 103 inch long length of fabric for each panel (since 3 yds=108 inches I rounded up to 3 yds of fabric per panel).  I wanted to keep the width of each panel the width that it came in off the bolt (this fabric was 54" wide).  I was making 4 panels.  So, I needed 12 yds of fabric.

2.  Lining the curtains.  I wanted to line these curtains because the fabric I purchased was kind of light and I wanted a full look and because I wanted them to be light-blocking.  I read about using painter's drop cloth for a drapery liner on Centsational Girl's site so I purchased 4 6x9 drop cloths ($9.99 each) from HD. 

3.  The process.  It took me a few trys but I have this process down now.  I don't have any formal training (can you tell?) so please bear with me and my non-technical jargon.
  • Unroll the curtain fabric (I did this on the floor) and cut to 103" long. 
  • Lay the drop cloth on top of the fabric and trim to about 4" narrower and shorter than the fabric panel.  The advice I've read about drop cloths is to prewash before using.  This is good advice because they tend to shrink after drying, the fabric is also a lot softer after washing.  I have to admit I was too impatient to do this for 3 of the panels so I'm in trouble if I have to launder these down the line.
  • Hem (I used iron on seam tape for this) the bottom of the fabric panel 1".
  • Lay the 2 pieces of fabric on top of each other, right sides facing, with the top of the drop cloth even with the top of the drapery fabric.  Here is a little diagram:
  • Pin and sew the right side of the drop cloth to the right edge of the fabric.  Pin and sew the left edge to the left edge of the drop cloth.  Since the drop cloth is narrower than the fabric, sewing the edges together ensures that only the curtain will show when finished.
  • Flip curtain inside out and iron edges creating a small seam on both edges with just the curtain fabric.
  • Flip curtain inside out again (now the right sides are facing).  Pin and stich the top. 
  • Flip curtain again, push out top corners.
  • Iron entire panel and hang using clip rings.
4.  Lessons learned.  Sew the sides first, then the top.  I took out so many seams :(.  Use a heavy gauge sewing needle and heavy weight thread, sew at medium speed.  I broke 3 needles in the process of figuring this out and thought my entire machine was broken (it wasn't).  Use the steam option on the iron for pressing the fabric.  I ended ironing on the hard wood floor with a towel under the part I was ironing.  This was the only way I could contol all of the fabric.  Don't iron directly on the carpet without a towel underneath (I learned this the hard way).  Don't hem the drop cloth, just cut the end and leave it.  After washining you may have to trim the loose threads but it doesn't need to be hemmed and its taxing on the sewing machine (mine anyway).

5.  Hanging the curtain rod.  Here is a shot of how I do the estimating.  I put up the tape and leveled it.  I got up and down the ladder a few times to eyeball the height, just using the tape.  The small vertical pieces of tape mark where the brackets go.


Cost.  $10 per drop cloth x 4 = $40
          Fabric @ $3/yd, 12yds = $36
          Curtain rod $15 x 3 rods = $45  (I used 2 rods for the long set of windows but put them together to look like one)
          Clip rings $7/pack x 4 packs = $28
          Total = $149

Here is the before and after (up to now, this won't be the final after):
Before

After

Linking to:


Thursday, March 31, 2011

Family Room Progress--Craigslist Tables and Marshalls Lamps

I blogged about my latest design dilemma here, the Family Room.  This is the room that gets the most use, is smack-dab in the middle of the house, and right now its really boring plain.

I found some end tables on Craigslist.  I really wanted something round, at least on one side of the sofa.  I didn't necessarily want matching tables and didn't necessarily want more dark brown wood--but I liked them, they were the right price, and there is always paint! 

For $100 I bought the 2 end tables and the matching coffee table.  I can sell the coffee table later on if I don't find a place for it. 

I was on a roll because the next day I found these cute lamps at Marshalls for $30 each.

Here is one of the tables and one of the lamps in the Family Room.


And here are the two identical tables and lamps flanking the sofa:
The sofa is looking really sad in this picture, its really not so bad--needs fluffing!  Here is a closer look at the other table that's in the corner.


At least its a start.  Next up.....fabric.  Here is a sneak-peak:

Side note:  So far my photography skills are lacking, I'm putting 'improving my pictures' on my todo list.

Blankets, A Girl's Best Friend

I took at trip to the fabric store to search for color to add to my Family Room and brought my 2 girls.  While I went to the back of the store to search through the home decor fabric the girls did their own browsing.  It wasn't long before they were running up to me so excited to have found the 'perfect' fabric for a blanket.  I couldn't say no, how often do I see my kids excited about fabric?  The good news is that I did manage to find some really nice fabrics for the Family Room--at only $3 a yard!  (Post about the Family Room progress coming soon.)

I got home so excited to start making panels for the Family Room but there was no way I was going to be able to do anything before the blankets were done.  So I spent that evening making 2 blankets (2 mom points for me).

Blanket #1.  Double-layer fleece blanket.  I purchased 1 1/2 yards of each color, lined them up and stitched up 3 sides and most of the 4th side, leaving a 5 inch opening.  There is no need to put right sides together with fleece because both sides are 'finished'.  I flipped the blanket inside-out, pushed out the corners, and hand stitched the 5 inch opening.  The 1 1/2 yards makes a blanket that is close to the size of a throw.


Blanket #2.  Small snuggle blanket.  I got 1/2 yard of the pink faux-fur.  For this blanket, I just folded it in half with finished sides together.  I stitched the remaining 3 sides leaving a 3 inch opening.  Once again I flipped the blanket inside-out, pushed out the corners and hand stitched the 3 inch opening closed.


Not sure if its obvious, but both girls LOVE their blankets.

Linking to:


Wednesday, March 23, 2011

Family Room--Indecision

I'm not even sure if indecision is an appropriate word for my feelings toward my family room--I can't figure out where to start!  The entire first floor of my home is open--all of the rooms flow into each other.  I would like to paint but right now I'm not ready to make a decision on the colors for the entire first floor.  Here are some pictures, hopefully I can call them "Before" pictures soon!

BEFORE (currently)


Here are the things that I like in the room:
*  The fireplace.  I've always wanted a stone fireplace and I finally got one (this in house #5 for me btw).  I love the stone, I love the colors of the stone. 
*  The rug.  I know its plain and boring but once again I choose this because I didn't know what to do with this room color-wise.  Even though its plain, its real comfy, I put a carpet pad underneath to make it plush.  And I like the light color on the dark floor.
*  The blinds.  Like the ceiling fan, they are dark and kind of weigh down the room but they are functional and look like nice quality blinds.

Here the things that I can live with:
*  The ceiling fan.  I feel like it weighs the room down but I like having a fan for the function.  I think its a little dark so maybe I'll work on that.
*  The sofas.  I've had these monsters for a while (9 years?) and they have been through the ringer with the kids.  The cushion covers have been washed so many times.  They are a little large for this room but still comfortable and still look pretty good after fluffing.  I would love to have a sleeker sectional that would wrap around the 2 outer walls.

Here is the room layout (pardon my limited photoshop skills):


Here is my todo list:
*  Curtains to add color and/or pattern.  Its spring and I really want something bright.
*  End tables.
*  Lighting for either side of the sofa (maybe table lamps), and for the chair (floor lamp?).
*  Decorate the fireplace mantle--something simple.
*  New/different artwork on the walls. 
*  I would LOVE to get a flat screen TV and hang on the wall to replace this old dinosaur, but that is not in the budget right now.

Just writing this post is motivating me.  I will update you soon with my progress. 

I would love to hear your suggestions!

Linking to:

giveaways

Monday, March 14, 2011

Refrigerator Platform

We have a really small garage.  Well, it is a 2-car but with my van, my husband's Prius, 6 bicycles, golf clubs, tennis racquets, basket balls, footballs, baseballs, etc. oh, and 2 huge trash cans--its packed.  We were trying to figure out a way to add a full-sized refrigerator and I had an idea.  I can't say its an original idea because I saw something like this in my friend Erica's garage (hers was beautifully built, ours would be a purely diy job).

Here is the situation.  You can see my huge van and how I have to squeeze it in.

Here is a better "before" picture, minus the vehicles:


After getting the measurements for the refrigerator we wanted to buy, it seemed like it could fit in the corner to the right of the door.  It would be tight but it really, really seemed like it would fit.  Worth a try.

Time for some destruction.  The small wall had to go.  I didn't have a crowbar so I used my hammer and the really long tree clippers which acted like a crowbar.

There's my guy!  Didn't there used to be something here?

Time to build the platform.  The plan was to build 2 U-shaped supports with 2x4's, hereafter referred to as the "U"s.  Here they are completed.  We used two 2 1/2" screws at each corner.  At first we tried the screw without drilling a pilot hole but it was real difficult, almost impossible, and the wood started to split.  So we used pilot holes.


I went to Home Depot and had them cut some 3/4" plywood into 4 pieces.  One piece of plywood was secured to each U with six 1" screws.


I didn't get pics of the next few steps.  One U was placed on each side of space where the platform is to go.  A few nails were used to attach U's to the wall.  The final step was to secure the top of the platform to the supports and the top step.  We ended up using 2 pieces of plywood on top of each other, using the screws to hold everything together.
Strong enough?
It was really, really solid!  Two days later the refrigerator was delivered.

It works!  Yes, a tight fit but really convenient and we weren't using that corner of the garage. 

Linking to: